Creating Demos - Coder Tutorial #2
[In Code We Trust]
By Polaris
Greetings demo Sceners!
This time we will be making some very traditional old school, demo style graphics.
I start with some basic computer graphics theory, and then move into code for a
few effects. Let's get started!
Computer Graphics - A Universal Paradigm
It's easy for us to take for granted technologies that have been around for a while.
We hit the light switch - and we expect light to be the result.
Few of us actively think about the fact that we are completing an electric circuit,
which results in the well-known glow of light. Some people call this "compiled knowledge".
Essentially we get so used to the ideas that we don't think about it anymore.
The same is true with computer graphics. We've gotten so used to certain paradigms,
that we don't tend to think anymore without them. However, this doesn't help a beginner
to learn. So spend a moment with me to help establish our computer graphics foundation.
Everyone, new and experienced will learn something from this!
It's all about the dots!
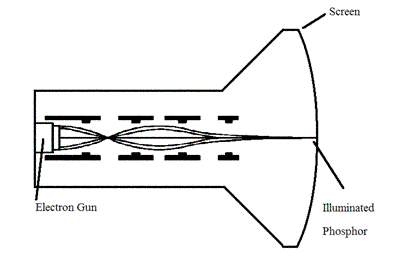 Most computer monitors are still the CRT [or Cathode Ray Tube] type.
Even when dealing with new LCD technology in flat panels or laptop screens;
the terms and ideas are identical. (So think of everything like a CRT monitor
and you will be just fine!) A CRT monitor has a few basic components that work
together to create the image you see on the screen. The most important of those
of course - is the screen. The screen is glass coated with a phosphor coating.
Phosphorus is a highly flammable chemical, so the screen you see isn't just a flat
piece of glass. It's actually really like a bottle [or a tube!], in which all the air
is pumped out. Without the air - the chemical can't burn uncontrolled.
Luckily when it's energized... it glows! Using what's called an "electron gun" -
we energize bits of the phosphor on the screen in different ways.
With special tricks certain spots of the screen will glow red, green,
or blue when energized. Line those up in a grid pattern - and you can adjust
your electron gun to change how strong it is as it passes. Since every colour
is made up by various quantities of red, green and blue - any colour can be "mixed"
on the screen. This means every image - is essentially a grid of phosphor dots,
glowing in various combinations of red, green and blue. These dots are called Pixels
[short for Picture Elements]. In summary - the electron gun in the back of the monitor;
zaps bits of the screen, reacting with phosphor to make areas glow in different colours.
Have a look at your screen with a magnifying glass! You might be able to pick out
the various cones of colour!
Most computer monitors are still the CRT [or Cathode Ray Tube] type.
Even when dealing with new LCD technology in flat panels or laptop screens;
the terms and ideas are identical. (So think of everything like a CRT monitor
and you will be just fine!) A CRT monitor has a few basic components that work
together to create the image you see on the screen. The most important of those
of course - is the screen. The screen is glass coated with a phosphor coating.
Phosphorus is a highly flammable chemical, so the screen you see isn't just a flat
piece of glass. It's actually really like a bottle [or a tube!], in which all the air
is pumped out. Without the air - the chemical can't burn uncontrolled.
Luckily when it's energized... it glows! Using what's called an "electron gun" -
we energize bits of the phosphor on the screen in different ways.
With special tricks certain spots of the screen will glow red, green,
or blue when energized. Line those up in a grid pattern - and you can adjust
your electron gun to change how strong it is as it passes. Since every colour
is made up by various quantities of red, green and blue - any colour can be "mixed"
on the screen. This means every image - is essentially a grid of phosphor dots,
glowing in various combinations of red, green and blue. These dots are called Pixels
[short for Picture Elements]. In summary - the electron gun in the back of the monitor;
zaps bits of the screen, reacting with phosphor to make areas glow in different colours.
Have a look at your screen with a magnifying glass! You might be able to pick out
the various cones of colour!
 There is a bit of a catch. An electron gun leaks a stream of energy like water out
of a garden hose. The energy stream is influenced by magnets. Computer monitors
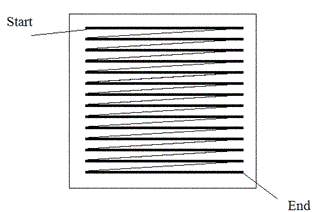
use electromagnets to influence the aim of the gun. To make an image,
the gun has to "paint" the screen in a sweep. It starts at the top left
and moves from left to right. Each time it finishes drawing a row it moves
to the next row and starts over again. This results in a "grid" of dots
on the screen - which form the image you see. This process is done quite fast;
so we never really notice that the image is "painted" from the top down.
(Most of the time!) It's for this reason that taking a photograph of computer
monitor or video tape - will look weird. It's capturing a partially drawn image due to
the "screen retrace". Monitors typically draw an entire scene from top to bottom
around 50-60 Hz. [50 or 60 times per second]. Better monitors will render it up
to 120 or even more Hz. An increased frequency is easier on the eyes, and helps
improve the "POV" or "Persistence of vision effect", essential to animation.
There is a bit of a catch. An electron gun leaks a stream of energy like water out
of a garden hose. The energy stream is influenced by magnets. Computer monitors
use electromagnets to influence the aim of the gun. To make an image,
the gun has to "paint" the screen in a sweep. It starts at the top left
and moves from left to right. Each time it finishes drawing a row it moves
to the next row and starts over again. This results in a "grid" of dots
on the screen - which form the image you see. This process is done quite fast;
so we never really notice that the image is "painted" from the top down.
(Most of the time!) It's for this reason that taking a photograph of computer
monitor or video tape - will look weird. It's capturing a partially drawn image due to
the "screen retrace". Monitors typically draw an entire scene from top to bottom
around 50-60 Hz. [50 or 60 times per second]. Better monitors will render it up
to 120 or even more Hz. An increased frequency is easier on the eyes, and helps
improve the "POV" or "Persistence of vision effect", essential to animation.
If you present an image to a viewer, and then rapidly switch it... it looks like
a slide show. However, if you take a sequence of images.. and play them back - like
a film strip... you end up with a picture that appears to move. Of course,
if you slow that down, at a certain point it looks like still frames.
However, at around 10 Hz - these images blur and create the illusion of movement.
The faster you go - the stronger the illusion and the quality of the resulting
moving picture. When you configure the advanced tab of your video card on a Windows
OS computer - you will notice that the monitor tab has a drop down box for
"Screen refresh rate". Go ahead and try these settings - and see how your
refresh rate changes the look of your screen. Be sure not to push the rate
too high - if it's beyond the abilities of your monitor you may damage your equipment.
Read your monitor's instruction booklet for the specs on what your monitor can do.
Refresh me?
 So, why have I bothered discussing this stuff? Well there are a few reasons.
Some very cool old school things have been done with manipulating refresh rates / screen
drawing. Copper bars - which is a common and famous demo scene effect - was often
achieved by manipulating the electron beam as it passed down the screen. Another
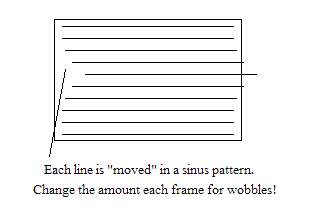
really amazing effect is known as a "wobbler". A wobbler effect changes the starting
point of the electron beam as it paints the screen - causing the image to shift.
It does this in a sinusoidal pattern - essentially shifting the lines a little bit,
then more and more... till a peak is reached and then back down again. If you change
the amount this is done for each total refresh - you can "wobble" or "wave" the image
on the screen, without changing the image that's being rendered.
So, why have I bothered discussing this stuff? Well there are a few reasons.
Some very cool old school things have been done with manipulating refresh rates / screen
drawing. Copper bars - which is a common and famous demo scene effect - was often
achieved by manipulating the electron beam as it passed down the screen. Another
really amazing effect is known as a "wobbler". A wobbler effect changes the starting
point of the electron beam as it paints the screen - causing the image to shift.
It does this in a sinusoidal pattern - essentially shifting the lines a little bit,
then more and more... till a peak is reached and then back down again. If you change
the amount this is done for each total refresh - you can "wobble" or "wave" the image
on the screen, without changing the image that's being rendered.
While these effects are amazing - they weren't always without their costs.
Demo coders of the late 80's and early 90's were always pushing the envelope.
Certain demos could damage your monitor [this was rare] - depending on how your monitor
differs from the monitor of the demo's creator. More likely; coding errors could bring
that ominous "snap... buzz"; to your monitor. Damage occurs when energy
is focused on a part of the screen that isn't protected with phosphor.
Ask any old school person in a demo party - you will probably find a few tales about
monitors that were lost this way.
A virus writer during this computer era took advantage of this technology with
real malicious intent. His virus acted like a screen saver, drawing a turkey
on the screen.. and moving it around. People probably thought it was cute.
However, during the same time - it would move the electron gun to focus on the
furthest areas that it could. Sometimes it would get very close to the back
of the monitor itself. The intent - to damage or explode the monitor of the
infected machine. Not nice!
Luckily [or unluckily, depending on your view] - it's darn hard to achieve
these effects anymore. Operating systems tend to get in the way. There are
some really advanced ways to do some of these effects [I'll show a copper bars
technique much later], but for the most part - the era is gone. We aren't home
free however - there are some important things to remember about retrace, even in
the modern world.
Waiting to Retrace
 So.. the computer monitor does a retrace ... every 50,60 or more Hz. At this point
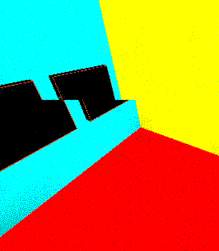
it takes whatever it has in video memory [this is where you image is stored before
the monitor draws it] - and renders it. If you were in the process of adding a space
ship to 2d grid of pixels in video memory, were only half way done, and it was
"that retrace time again" - it would render the scene. If you were ready or not!
Of course; by the time the next retrace occurred, your space ship would probably be
committed completely to video memory. The scene presented to the viewer before
however - is "sheared". This looks ugly. The picture I created is exaggerated - but
it illustrates the problem dramatically.
So.. the computer monitor does a retrace ... every 50,60 or more Hz. At this point
it takes whatever it has in video memory [this is where you image is stored before
the monitor draws it] - and renders it. If you were in the process of adding a space
ship to 2d grid of pixels in video memory, were only half way done, and it was
"that retrace time again" - it would render the scene. If you were ready or not!
Of course; by the time the next retrace occurred, your space ship would probably be
committed completely to video memory. The scene presented to the viewer before
however - is "sheared". This looks ugly. The picture I created is exaggerated - but
it illustrates the problem dramatically.
Over time, graphics programmers got smarter. They learned to do a couple of things
to prevent shearing. One solution was to "double buffer". You would draw everything
in a secondary spot of video memory. When the scene was completed - you would tell
the video card to draw based on the image in that spot. To render the next frame
of the image - you would use the spot the video card originally had been rendering.
Switching between the two - you can be guaranteed that the frames will be displayed
completely and without shearing. This assumes of course - that you have enough
video memory to actually store two copies of the pixels that make up the scene!
Another technique is to wait for the retrace. Imagine that your refresh rate is 60Hz.
If you know that your code to do the scene drawing is less that 1/60th of a second - all
you need to do to ensure that you don't shear your image... is to start drawing just
after a retrace has occurred and then wait for the next one. This is the simplest
technique - and the one that we will use for your first graphical example.
Breaking Ground.... Allegro?
You probably thought that after the last tutorial - that we were done setting things up.
Well, the bad news is - there is a little more setup you need to do.
The good news however - is if you follow along carefully - it's going to be
very painless. [You followed my instructions last time to install Dev C++ right?]
We will create our first graphic based example using a library called "Allegro".
Allegro gives us everything to make two dimensional computer games - on a host
of platforms.
The Allegro library started around 1996, by Shawn Hargreaves for the Atari ST.
There are a few reasons why I'm showcasing Allegro instead of using the old school
"here is the assembly code to draw a pixel" approach.
- Times have changed. Finding a compiler that can run inline assembly to do the
old school (mode 13h) approach is hard. If you are doing strictly Dos based development
with Dos compilers - you can easily find a library to do that work for you.
- I'm more interested in teaching computer graphics & demo making ... than teaching
how to fight with the operating system. You still get the end result - learning how
to make demos - but without needless frustration.
- Allegro is open source, and supports a plethora of compilers and platforms. With a few
tweaks, you can change our example code to run on Linux. On a windows box - it will run
taking advantage of direct X. On Linux it will take advantage of X11.
Either way - Allegro adapts to the platform it's on. Good performance, where ever you are!
- Allegro isn't strong at 3d graphics. This is exactly where we want to be!
Making demos isn't about just learning one system and sticking with it.
It's about learning how to make the API's do what you need them to do.
Open GL, DirectX, AllegroGL - anything. While we are dipping into Allegro
for 2d graphics - the ideas we get out of it - we can apply everywhere.
Installing Allegro
Note - these instructions assume that you installed Dev-Cpp as specified
in the last tutorial. If you are using an alternative compiler, these instructions
may not apply to you. If you don't have a compiler - go ahead and install Dev-Cpp
and then come back here. Now you have your compiler - hold no fear!
These simple instructions should get you going in no time flat.
Step #0 - Check your pre-requisites
As I mentioned, Allegro takes advantage of your OS platform. So to run Allegro
on windows - you need to have at least direct X 8.0 installed. I expect that
you will have at least direct X 9.0 installed for tutorials later on. If you don't
have it installed - zip over to Microsoft, and get Direct X 9.0B. You should probably
update your video card drivers at the same time.
Step #1 - Downloads
The first step is to download the Allegro package. There is no binary "version" of
the package - to keep it multi platform they force everyone to re-compile it themselves.
Download the source code from all403.zip from
http://prdownloads.sourceforge.net/alleg/all403.zip?download.
After that - we also
need dx80_mgw.zip. This is the code that takes advantage of Direct X on the
windows platform. You can get it from
http://alleg.sourceforge.net/files/dx80_mgw.zip.
Step #2 - Get ready, Get set, Extract!
Now you've got your zip files ready - it's time to extract them.
Extract the all403 folder - to a new allegro folder in C:\Dev-CPP
[ie C:\Dev-CPP\allegro]. You don't entirely have to put them there - I find it
easiest and cleanest that way. Make sure that you didn't add an extra folder
in the chain by mistake. If you go to C:\Dev-Cpp\allegro - you should have 12 folders -
demo, dos, examples, include, lib, misc, obj, resource, setup, src, tests, tools,
and a bunch of other files. If you don't - STOP. Try to re-extract again. Check
to make sure you don't have them in C:\Dev-Cpp\allegro\allegro or
C:\Dev-Cpp\all403\allegro. Make sure you fix the paths so
they work before going on.
Once that's complete - you need to extract dx80_mgw.zip. This zip has two folders
"include" and "lib". Some of these files will already by in your system;
so when you copy them over during the extract to C:\Dev-Cpp\, don't be surprised
it asks you to overwrite. Got that done? Great... now we can move on!
Step #3 - Compiling the library
Now that we've extracted the code; we need to compile the library.
Here are some easy to follow instructions.
From a command prompt, enter:
1. SET PATH=C:\Dev-Cpp\bin;%path%
2. SET MINGDIR=C:\Dev-Cpp
3. gcc -v
You should see:
Reading specs from C:/Dev-Cpp/bin/../lib/gcc-lib/mingw32/3.2/specs
Configured with: ../gcc/configure --with-gcc --with-gnu-ld --with-gnu-as --host=
mingw32 --target=mingw32 --prefix=/mingw --enable-threads --disable-nls --enable
-languages=f77,c++,objc,ada --disable-win32-registry --disable-shared
Thread model: win32
gcc version 3.2 (mingw special 20020817-1)
4. cd /d C:\Dev-Cpp\allegro
5. fix mingw32
You should see:
Configuring Allegro for Windows/Mingw32...
Done!
6. make
You should see:
The optimised MinGW32 library has been compiled.
Run "make install" with the options you passed to "make"
in order to complete the installation.
If you don't and see things like:
obj/mingw32/alleg/wdsndmix.o(.text+0x361):wdsndmix.c: undefined reference to `DirectSoundCreate@12',
Redo the dx80_mgw.zip extraction. You've done something wrong.
7. make install
You should see:
The optimized MinGW32 library has been installed.
Celebrate! You've now compiled and installed Allegro!
Our First Allegro Program
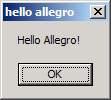
Our first Allegro program - will be a variant of the hello world program we made before.
This time however - we will be making it with the allegro library. Here is a step by step
on making your first Allegro program:
1. Start Dev C++
2. Start a new project [file / new project]
3. Select Console Application, give it a name, and select OK. [I named mine Hello Allegro]
4. Save the .Dev file to the folder of your choice.
5. Change the code in main.cpp to read: [note you do need the line "END_OF_MAIN();"
#include "allegro.h"

using namespace std;

int main(int argc, char *argv[]) {
      allegro_init();
      allegro_message("Hello Allegro!");
      return 0;
}
END_OF_MAIN();
6. Add the Allegro library to your project as follows:
a. Select Project / Project Options
b. Go to the parameters tab
c. Select add library or object
d. C:\Dev-Cpp\lib\liballeg.a
e. Select ok!
7. Compile!
8. Run!
9. Enjoy! It's your first Allegro program!
Allegro Snow?
 While exciting that we've got Allegro working - not actually fantastic until we have
something animating. I thought long and hard about what would be a good way to
kick things off. I wanted to introduce the intricacies of mode 13h - a classic video mode,
while doing something really amazing. I also wanted it to be pretty simple for
people to pick up. In the end, I went for a slightly simpler effect; inspired by
the weather outside.
While exciting that we've got Allegro working - not actually fantastic until we have
something animating. I thought long and hard about what would be a good way to
kick things off. I wanted to introduce the intricacies of mode 13h - a classic video mode,
while doing something really amazing. I also wanted it to be pretty simple for
people to pick up. In the end, I went for a slightly simpler effect; inspired by
the weather outside.
W00t you say? Well, I live in Winnipeg, Manitoba, Canada. The weather here is
harsher than in most places; and the winters are long. No mater what Toronto
says - we've got them beat when it comes to cold weather. We go from -40'C (Celcius)
to +40'C between summer and winter every year. That's pure temperature - no
wind chill taken into account. Often we go a few months with weather below -30'C.
So... we went from +26'c being the High on Sunday; to -3'C on Tuesday,
and it snowed - off and on for the next 48 hours - covering everything. I've taken
a picture of the view from outside my study - so you can see just how appropriate
this demo effect is!
So, you guessed it! - For our first graphical effect - we are going to make snow.
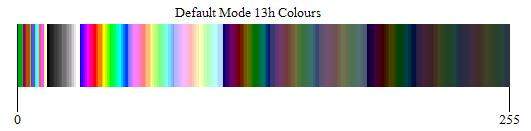
We will use the classical mode "13h", which is 320 pixels wide by 200 pixels high.
Each video card is programmed to support a variety of video modes. These are defined;
and standardized between software and drivers. We can then as programmers - setup the
video mode and render graphics on the screen! For mode 13h, [320x200x256]; let's consider
movement in X to be in width; and movement in Y to be in height. This results in a grid
of pixels - 0,0 being the top left, and 319 by 199 being the bottom right. Each pixel has
a color range of value from 0-255. So... essentially - each pixel is a byte in size;
and with 320x200 pixels - we get a full screen image in 64000 bytes. This video mode
is known as "8 bit" color - since we can store the colour value in 8 bits worth of data.
As you can see - we can have a total of 256 different colours on the screen in mode 13h.
This isn't a lot of colours - but it's enough for a good start. In the time this was
introduced - most video systems were doing at most 16 colours in EGA [extended graphics
adapter]. To have 256 colours was mind blowing! However; the designers gave us something
more than just a basic set of colours. Imagine for a moment that we are acting
like painters. We have 256 cans of paint, labeled 0-255. We can paint any scene on
a 320x200 grid (0-319, 0-199). We might decide that we want to draw something in black and
white. So we adjust the colour of paint in the cans to be a range of greys... and then
paint. As you can see we can adjust the palette of paint colours - to suite the image you
have on the screen. You an only have 256 different "paints" for any given scene - but you
can choose what those are!
For now we are going to use the default set of paints [known as a palette]. Here is what
this looks like:
So! We've gone one about this long enough - it's time to break into some code.
Make a project just like last time; and include this code:
#include "allegro.h"

using namespace std;

// data structures for snow flaxes = very simple
const int total_flakes=900;
const int total_layers=3;
struct particle
{
    int x,y;
    int layer;
};

// global data - okay for a simple example like this
particle flakes[total_flakes];

// This function initalizes the particle flakes
void initalize_particle_flakes(void)
{
    int i;
    for (i=0;i<total_flakes;i++)
    {
        flakes[i].x=rand()%320; // 0-319 [x]
        flakes[i].y=rand()%200; // 0-199 [y]
        flakes[i].layer=rand()%total_layers;// [0-2] [layer]
    }
}

// This function draws all the particle flakes
void draw_particle_flakes(void)
{
    int i;
    for (i=0;i<total_flakes;i++)
    {
        // note - we are drawing according to the color scale
        _putpixel(screen, flakes[i].x, flakes[i].y,
                  flakes[i].layer*5+20);
    }
}

// This updates the particle flakes
void update_particle_flakes(void)
{
    int i;
    for (i=0;i<total_flakes;i++)
    {
        // drop the particle down - depending on layer
        // [plus one - since layer zero would result
        // in no motion otherwize]
        flakes[i].y+=flakes[i].layer+1;

        // check for wrap around
        if (flakes[i].y>199)
        {
                flakes[i].x=rand()%320;
                flakes[i].y=0;
                flakes[i].layer=rand()%total_layers;
        }

        // new x position
        flakes[i].x=(flakes[i].x+(2-rand()%5)) % 320;
    }
}

// main program
int main(int argc, char *argv[]) {
            int i;

            allegro_init();        // init Allegro
            install_keyboard();    // setup allegro keyboard

            set_color_depth(8) ;   // 8 bit colour
            if (set_gfx_mode(GFX_AUTODETECT_FULLSCREEN,
                320, 200, 0, 0)<0)
            {
                set_gfx_mode(GFX_TEXT, 0, 0, 0, 0);
                allegro_message("Failure to init video mode!\n%s\n",
                                 allegro_error);
            }
            initalize_particle_flakes();

            while ((!key[KEY_ESC])&&(!key[KEY_SPACE])) {
                  update_particle_flakes();
          vsync(); // you might want to add another vsynch;
                   // depending how fast
          // vsync();/          //things are moving on your box
          clear_bitmap(screen);
          draw_particle_flakes();
    };

            return 0;
}
END_OF_MAIN();
It's Snowing!
 Provided you've implemented the code, you should now be able to get into your
demo school groove, and watch some on screen snow! How old school is that?
The snow has three levels 0-2 - and each particle moves down the screen according
to the layer it's in. This means that snow flakes that are darker appear further
away and move more slowly, creating a parallax effect. There are some very important
things I would like to touch on at this point.
Provided you've implemented the code, you should now be able to get into your
demo school groove, and watch some on screen snow! How old school is that?
The snow has three levels 0-2 - and each particle moves down the screen according
to the layer it's in. This means that snow flakes that are darker appear further
away and move more slowly, creating a parallax effect. There are some very important
things I would like to touch on at this point.
How fast are those snow flakes moving? Well, the "closest" and brightest flakes are
moving by 3 pixels every frame. We are waiting for the vsync - so if our screen is 60hz,
a snow flake will go from top to bottom by 3 units every 1/60th of a second. Since the
screen is 200 units, it takes ~66 frames to pass, which means it's snowing about one flake
the entire screen in one second. Well, guess what folks - that's way too fast. If you run
the code as is - you will see the just flakes fly by. (or perhaps not even!)
Listen to Grandma you hear!!! - Use timers!
So... a quick hack to the code is to simply add another vsynch, slowing it down to half.
This works - having the fastest flake taking about 2 seconds to move down the screen is OK.
But - notice a major assumption. I run my laptop at 60hz, but my PC at 120. The snow moves
twice as fast on my PC than on my laptop. While it's important to wait for the vertical
re-trace... it's not best to use it blindly. It's possible in a lot of situations to
over-ride the desktop settings for the speed of refresh. Then of course, we will know what
it means to in Hz for a "wait for retrace". Still this isn't an optimal solution. If the
system is capable of better refresh rates - why not use them? For now, this is "good enough"
for our first effect. I'll be showing better ways in the next tutorial. So don't get used
to it you hear!
Going Further - Iterative Development!
So.. you've got snow. Now it's time for you to play. Here are a few ideas on things
to try:
Snow is great - but it's got to pile up! You might find it easiest to play with the
"int getpixel(BITMAP *bmp, int x, int y);" function to do this, looking to see if there is
something already plotted at the positions you are thinking about drawing on.
Once you have snow piling up... sounds to me like you might want to put in a greeting.
Nothing looks quite as good as having some text getting snowed on. Use the text out
function to draw text on the screen!
void textout_centre_ex(BITMAP *bmp, const FONT *f, const char *s, int x, y, color, bg);
Sharing Your Stuff with Me and Others - a few Tips
Folks - be sure to send me the stuff you make with this! Drop me an email!
While I would love to be the first to see the creations you base off of this - I'm sure
that you will want to send them to your friends. When you do - remember... this tip.
Not only does the recipient of your production need Direct X 8 or above - but they will
also need alleg40.dll in addition to your exe file to run it. So, when you zip up your
cool snow effect - drop alleg40.dll into the zip as well.
It's in your C:\Dev-Cpp\allegro\lib\mingw32 folder.
So; next time we are going to kick it up even
more old school. I promised in the last chapter - that we would
make some animations without even needing to "move anything". All that trickery will be
revealed for some amazing old school goodness. So keep
your Allegro handy - play and have fun! We'll be using those skills
over the next few issues!
Stay frosty!
Polaris