
Creating Demos - Coder Tutorial #1
[The Great Setup Escapade]
By Polaris
Greetings demo Sceners! It's with great pleasure that I begin this series of demo coding tutorials. It's time to part the ocean, walk on water, and design our own demos from the ground up with your own code. So, prepare yourself to become one of the priests for the new digital age, as you learn to extend your technical wizardry!
Audience
I'm writing these articles for you silly! Yes, I realize that you know that... But do you really know that? I know what these articles contain (as I'm writing them!), and while it's fun to research and write them... I'm not writing them for myself. I expect these articles to fill an important void in the scene. To do this I need your feedback to ensure that I'm going in the right direction. I'm happy to write about any particular topic or technical question... just let me know! I might not be able to discuss them right away - but I will ensure that I cover the topics you suggest. Right now - I have the following objectives in mind for this tutorial series:
Tutorial Series Objectives
Accessible: Yup.. that's right. It's important to me that these articles be accessible.What does that mean? Well, it means that anyone can start with Tutorial 1, and go up from there. Artist, musician.... or just plain average Joe. So... please.. if something isn't understood in this tutorial- let me know! For this reason - this article is designed to give us all the same level starting ground [and is hence called the Great Setup Escapade!].
Doing What Hasn't Been Done: There are plenty of great tutorials on the Internet and of all kinds of types. I'm not interested in necessarily re-inventing the wheel, only for the sake of re-inventing the wheel. Instead, I will reference these tutorials and resources when appropriate.
A Unified Approach - While there are plenty of resources, few if any ever really show you how to put it all together. That's a really big challenge. Years ago, I spent some time trying to find a tutorial on how to build a demo engine. I searched all over, and found a minor article on macscene.org. The situation hasn't changed very much since that time.Ā How do you integrate art and music through code to make a production? I'm looking to answer that here.
Focus on Free Tools - One of the silliest things that you will typically encounter when coding demos and trying to learn from others... is compiler woes. People naturally use different compilers; and that's healthy. However... a big problem is that compilers tend to be allergic to each other. Code compiled somewhere won't like to be compiled with a different compiler. [I haven't quite discussed compilers yet, so jump back here later if you are confused]. By focusing on high quality free (inexpensive) tools, we end up with a uniform compiler platform between us. This chases all the compiler woes go away, and focuses at the task at hand. At some point I hope to build an integrated Demo Scene Tool Kit CD showcasing some of these high quality products. As we proceed into more tutorials, I'll be showcasing some excellent software.
Old School Foundations and New School Techniques
I've been making underground (non-released) demo productions for a long time, and public productions for the last three years. I doubt we need any more tutorials on writing directly to the sound buffer, circa 1994. However, there are a lot of old style demo effects that can easily be ported over to new style techniques. In addition to that, some of our latest technologies are allowing us to push our systems in ways that are similar to the late 1980's and mid 1990's.Ā This means that having enough knowledge to understand the techniques of the past can help us fly with the technology of the present. For this reason, some of the tutorials might seem start out slow. However, don't let that dismay you - as in the next few months... we'll be gaining a lot of speed awfully fast. The Coder being Master of All Knowledge - I'm not going to write just about code. W00T you say? You heard that right. As coders, we can't afford to be narrow minded in our skills. We have to be responsible for the audio engine that renders the mp3, ogg, or what have you. We are also responsible for animating that cool 3d model file, and a host of other tasks. If you don't have a hot clue how to make some of these things in the first place; you don't really have a place to start. As the coder, you are responsible for bridging the gap between music, art and code. In the end, it all falls on you. I'll never suggest you compete with your artists in their domain. I still think it's important to know how to create simple versions of these types of assets yourself. This means you will be able to understand "their" world... and to make it work in the "code world".
Who Am I Anyway?
Ah... I suppose that's a good question. Well, I'm Polaris of the Northern Dragons. I founded the Northern Dragons demo group more than three years ago, in January of 2001. Before that time I was still involved in the Demo Scene, making a lot of productions for friends and a romantic interest. I am North American and am one of the few demo Sceners around in Canada that missed NAID. Quite simply, I was too young and didn't have enough cash at the time to make the trip. Since then I've participated in Assembly, and Pilgrimage.Ā
I don't profess to be the best coder; or the best technical wizard. In my humble opinion, my skills are probably average. However, I do put a lot of discipline into the code that I write... so everything should work without issues. I'll also be on hand if there are problems [via email]. I am a busy guy, so if it takes a day or two for me to reply; don't take it personally. You are under about 400 emails of spam, but I will get to you.
Breaking Ground.... The Great Setup Escapade
Our first task in demo creation is to select a compiler. A compiler is the tool that allows us to make software. Now... there are lots of languages and compilers out there. I'm interested in exposing you to tools that give you the most growth opportunities. While I could teach you to use something like Darkbasic, you will always be slightly limited by the engine. Dark basic is great for rapid prototyping, but things like BSP/PVS are implemented directly into Dark Basic because it's too slow to code those systems into Dark Basic itself. I suspect that Dark Basic has been built with C++! So, for our purposes we'll skip the middle man, and start learning how to code in C++ directly.
Breaking Ground.... The Great Setup Escapade
There are a few freely available C++ packages. Open Watcom, Borland C++, and Dev C++. I've selected Dev C++. It's also known as bloodshed. I've selected this as it's the most tightly integrated package available and it is completely free. It supports Direct X as well as OpenGL, and isn't too hard to get programs built with other compilers to work with it. It's a bit tricky to install; but if you follow these instructions - it will install just fine.
Phase #1 - Compiler installation
The first step is to download the compiler installation.To do this, download the base Dev C++ installer: [Dev-C++ 5.0 beta 8 (4.9.8.0) (12 MB) with Mingw/GCC 3.2].Ā Download and run devcpp4980.exe from http://prdownloads.sourceforge.net/dev-cpp/devcpp4980.exe. Following installation step by step should appear something similar to as follows:
1. Run the devcpp4980.exe
2.You will be prompted with the following standard dialog box. Select ok to continue.
3. After this you will be prompted with some information about Dev C++. Please read the license agreement, and then select "I agree" if you wish to continue installation. (If not, well.. abort this Tutorial ).
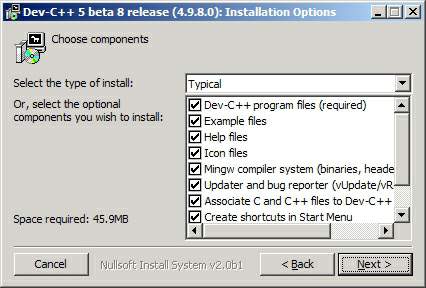
4. Be sure to select all the goodies in the world to make sure you aren't missing anything in your installation. (As shown in the picture):
5. Once you've selected your components, it will prompt you for the installation directory. I remained with the default "C:\Dev-Cpp". I suggest you do the same. If you change it you may need to take that into account for instructions in further tutorials. Either way, select Install to begin the installation.
6. Installation will begin and files will be copied. Once complete, it will ask if you wish to install Dev C++ for all the users of your computer. If you say [No], you will have to be logged in with the User ID you used to install the software.This probably isn't a big deal; but I find it simplest to share the software out to everyone... selecting [Yes].
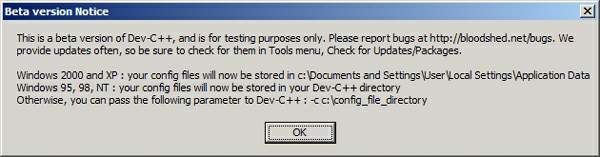
7. The final screen will mention that this is beta software. I should mention that it's the IDE that is beta, and not the compiler. The final .EXE(s) and products that you generate with this software - are rock solid.
8. Congratulations! The software has been installed. Now.. all that remains is to patch it!
Phase #2 - Patching Dev C++
The next step is to patch. I find the easiest way to patch it is to download the zip file devcpp4987.zip. Go ahead and download devcpp4987.zip from http://bloodshed.net/dev/devcpp4987.zip.
1. Once you have devcpp4987.zip, extract it to C:\Dev-Cpp. This will overwrite devcpp.exe and the languages files in the Lang directory.
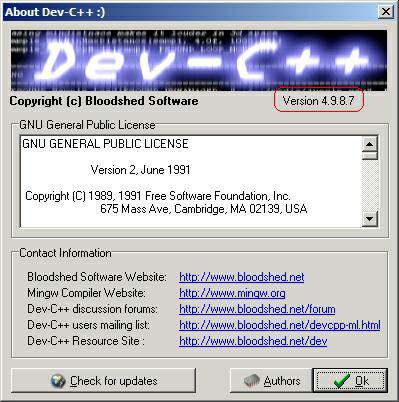
2. At this point all you need to do is to verify your installation.. to do this enter Dev C++ and Select [About] from the Help menu option. You should see the following:
3. If you've got that - you are ready to take on the world!
Beyond Breaking Ground.... Hello World.
At this point you have a fully functional compiler... that you can use to create your own applications. Not only that ... you can use it to hatch your schemes to take over the universe. Hmm... I suppose that's only if your name is Bill. In any case, at this point we can create the quintessential "hello world" program. This is the typical program that almost everyone that starts a new programming language learns.
Luckily for me, there is a great hello world program already on the internet. This was created by DJ Mirage. Let's take the source code from that article in Scene Rep #10, and compile it.
1. Start up Dev C++ via the Dev-C++ program entry.
2. Start a new project by selecting File / New / Project.
3. Select Console Application, and enter "Hello World" as the project name. This will be a C++ project.
4. Once you select OK - it will want to save the project as a .DEV file. Create a folder if you like, and save it..
5. At this point... Dev C++ has done some nifty things for us. These include
a. Source Code! There is some basic source code in the compiler window. This code appears as follows:
#include <iostream>
#include <stdlib.h>

using namespace std;

int main(int argc, char *argv[])
{
  system("PAUSE");
  return 0;
}
b. This source code template is a very simple program. The program calls the dos function (Pause).Ā This means that when your run the program, the first thing it will do is say something like "Press any key to continue . . ." and wait for you to hit a key. Once you press a key, the return is executed, and the program returns 0 back to the operating system. Console programs [Also Known as Text Mode Dos Programs], return what are known as "Error Levels". This way the operating system can know if your program worked or failed. You have a range of 255 Error levels, so you can return the number 0 - up to and including 255. Error Levels are used a lot in Batch files to tell if a program was successful or not.
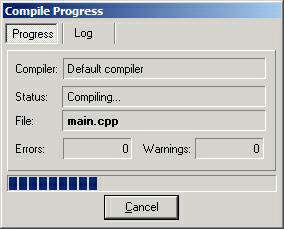
5. Let's play with this a bit. First off, let's see how it runs as is. Select Execute, and Compile from the menu. This will prompt you to save "main.cpp", the C++ source code for our project. Go ahead and save the file... and then watch the compiler as it compiles the code. This creates an executable program called "Hello World.exe".
6. Let's run hello world.exe. Luckily for us, you can do this right from the IDE. Select Execute + Run from the Menu.
7. Aha! We now have our first program... which waits for us to hit a key... and then exits. I suppose that's a bit less than exiting eh? All right.. I hear what you are saying. Let's mix it up a bit.

8. I mentioned that there is some cool code from DJ Mirage in SR 10. Go Over to SR 10, and select that code; or copy the following code from here:
#include "iostream"

using namespace std;

int main (int argc, char *argv[]){
char quit;

quit = '\0';
while (quit != 'q')
{

cout << "Hello world :)" << endl;
cout << "Press q to quit " << endl;
cin >> quit;

}
return 0;
}
10. Paste that code - right on top of the code from the template. (replacing it).
11. Recompile the file and execute it. Voila!A whole new program, which actually says hello world! [Note you will need to press enter to get the program to exit].
12. At this point - Read the SR 10 Article so you completely understand what the program is doing.
Going beyond... the Matrix
All right - I'll be the first to admit that "hello world" is a little dry. Okay.. okay... very dry. So... let's mix it up a bit with our own simple demo effect. What we will do is a simple Matrix like effect. [Similar to the Matrix Film]. Sure it will be cheesy; and cheap. But it rocks the Kasbah compared to hello world.
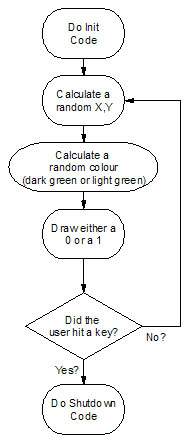
To do this - we need a render loop. Here is a simple flow chart that shows how this works:
Let's implement. For this example, we'll start a new project.
1. Start a new project by selecting File / New / Project.
2. Select Console Application, and enter "Matrix Effect" as the project name. This will be a C++ project.
3. Now... at this point our source code should look something like this: [as in the template]
#include <iostream>
#include <stdlib.h>


using namespace std;

int main(int argc, char *argv[])
{
  system("PAUSE");
  return 0;
}
4. At this point we need to create a render loop. To do this we will need to use a function called "kbhit". A function is a routine that in C++ lets you do something. All programs are functions (main), which return error levels [integer]. Our program receives some input - called argc, and argv. I realize that this is a bit confusing for now, but we will clean up any confusion with some great web resources that I'll be expecting you to study before the next article. Anyway, to use kbhit - we need to tell the compiler about this function. [It needs to know what kbhit does.] We do this by adding at the top of our program #include <conio.h>.
5. After we can use kbhit, it's pretty easy for us to build a loop that waits for a ... you guessed it ... KeyBoard HIT :-). So... changing this we should get a program that could look like the following listing. You will notice that I've removed the pause. We don't need it anymore, this program will do all the work in the {} while there is !kbhit(). The ! is the symbol for Not. So you are basically saying, while no kbhit, do this: { say "Lots of hello's now!"}.
#include <stdio.h>
#include <iostream>
#include <conio.h>

using namespace std;

int main(int argc, char *argv[])
{
  while (!kbhit())
  {
    cout << "Lots of hello's now!" << endl;
  }

  return 0;
}
6. Go ahead and run this program... and you will see lots and lots of "Lot's of hello's now!". The program will continue - until you break out of the while loop by pressing a keyboard button.
7. At this point we can extend this to create a matrix effect. To do this we need to know about the following:
a. How to draw coloured text.
b. How to calculate random numbers.
c. How to change the flow of the program, based on those random numbers.
8. Wow... that's not particularly easy is it? At this point I've introduced a fair number of new concepts... but the source code with a few comments [shown in //] should express it all for you. Have a peek at the program that does exactly that:
#include <stdio.h>ĀĀ // standard library [std = standard io =
// input / output ]
#include <iostream>ĀĀ// standard io stream [input output stream]
#include <conio.h>ĀĀĀ// console input / output con io
#include <windows.h>Ā// windows [operating system] functions for
// drawing text
#include <math.h>ĀĀĀĀ// used for math support.
using namespace std;
int main(int argc, char *argv[])
{
HANDLE OutputH;ĀĀ // Used by the operating system to access
// the console window
// [like a handle to hold
// onto something]
COORD position; // This is to hold the X position,
// and Y position
// (column and row) of the
// text on the screen.
// setup - here we get a handle to the screen for output.
OutputH = GetStdHandle(STD_OUTPUT_HANDLE);
while (!kbhit()) // this loops until a key is pressed
{
// calculate a random position to draw our text.
position.X=(int)rand()%79+1;
// rand()%79 gives us a range 0-78.
// We want 1-79; so we add one.
// Similar for Y
position.Y=(int)rand()%23+1;
// %2 is a good test for even or odd.
// So we do light green or dark green
// depending if the random
// number is even or odd [half the time]
if (rand()%2==0)
SetConsoleTextAttribute(OutputH, 2);Ā // Dark Green
else
SetConsoleTextAttribute(OutputH,10);Ā // Light Green
// here we use our handle to
// the screen as our "all access pass" to tell
// the OS where we want our text to show up.
Ā SetConsoleCursorPosition(OutputH,position);
// again - testing for even or odd.
if (rand()%2==0)
cout << "0"; //even
else
cout << "1"; // odd
}
// here we would place any tear down code or ending credits.
// For now, well... we don't have any =:-)
Ā return 0;
}
9. Go ahead and bring that source code into dev c++... and compile it. When you run it - you will get a nice matrix effect like the following:
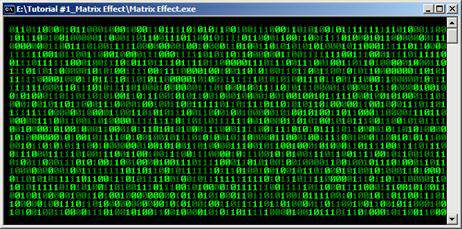
10. Congratulations! You've created your own cheesy effect! The sky is the limit now! [or at least we know everything is up from here!]
Pumping 110% - Training for the Next Tutorial.
Folks, I've introduced a lot of concepts here, and I haven't dived into them in great detail to explain them. There is good reason for this. There is an entire industry that has made a great deal of money making fantastic books that explain all the ideas of looping, functions, ... etc... for C and C++. So... here is a place where it's far better for me to send you to another resource.
We are especially lucky that some of these fabulous resources are available freely on the internet. One of these is the content of the book Teach Yourself C++ in 21 Days. You have four weeks before the next tutorial, and I'm expecting you to invest those wisely. However, I don't expect you to complete the entire text in that time.
Teach Yourself C++ in 21 Days.
[Web Version]
[Web Version Mirror]
[Web Version Mirror]
[Web Version Mirror]
[Web Version Mirror]
[PDF Version]
Homework?
Yes! But I promise that once you've mastered this - the ride will be a lot smoother. Don't skimp out on establishing your base knowledge. The better that you understand basic concepts of C++, the less snags you will run into later on. Luckily, we won't need every feature in the language. So... here are the following chapters you need to master:
1. Day 1 Getting Started
2. Day 2 The Parts of a C++ Program
3. Day 3 Variables and Constants
4. Day 4
Expressions and Statements
5. Day 5
Functions
6. Day 6
Basic Classes
7. Day 7
More Program Flow
8. Day 8
Pointers
9. Day 9
References
10. Day 10
Advanced Functions
11. Day 11
Arrays
12. Day 16
Streams
13. Day 17
The Preprocessor
So... it's only a total of 13 days, over the next four weeks! We will return to some more advanced topics [later] but for now these will do really nicely. You will notice that the book does not cover Dev C++, but it doesn't need to. You've already mastered the basics of compiling your own program. So, everything will work smoothly as your study. But that's not all! There is more stuff to review before the next article!
Examples, Examples, Examples
I suppose perhaps it's just me.. but I love examples. Luckily.. we've got some great examples on http://www.gametutorials.com. These examples show all the major concepts I'm trying to illustrate. They have Dev C++ project files under "Port(s):". So it's easy to download them and compile away. Ensure you have the mastery of the following examples.
1. Keyboard Input
2. For Loop
3. While Loop
4. Do While Loop
5. If Statement
6. Switch Statement
7. Conditional Statements
8. Mathematical Operator Precedence
9. Binary Operators
10. Preprocessor Directives
11. Strings
12. Functions
13. Macros
14. Random Numbers and Macros
15. Arrays
16. Structures
17. Reading From a File
18. Writing to a File
19. Recursion
20. Pointers
21. Pointers Part2
22. References
23. Dynamic Memory
What's The Other Side of The Mountain?
I imagine by now, you are exhausted. It's especially hard to drum up the energy to work on something like this if you don't have a goal to work towards. So... I would like to give you a bit of sneak peak about what we'll be discussing next month. Hopefully, the juicy topic will help keep you motivated as you get your skills up to speed for the next level.
In the next article, we'll be tackling some old style demo scene goodness. I'll be introducing the infamous mode 13h, a very common video mode to do computer graphics. I'll be teaching you how to animate something; without even moving pixels on the screen. I know that sounds bizarre; but I promise you - it can be done! If that isn't demo scene trickery, I don't know what is. Later on, we'll also touch on some demo scene fire and water - some very fun and traditional stuff to play with.
So.. as you can see - our next demo coding article will be well worth your efforts to master C++. I'll be looking forward to seeing your creations in the mean time. Don't forget to play with the examples, and code! I wish you the best journey, and look forward to meeting up with you next month on the "Other Side of the Mountain".