Polygon Drawing - Part 2
By Darkblade/TZT
Version 2.00 - Updated 9th March 2003
Disclaimer
Although a lot of time has gone into writing this document, Darkblade (Adrian Brown), Hugi and TZT hold no responsibility for the accuracy or effects of using this document. Any person using the information contained within this file do so at their own risk.
Contents
 Gouraud shaded triangles - Single light intensity triangles
The DrawTriangle routine - adding a single intensity value
Gouraud shaded triangles - R,G,B coloured triangles
The RGB true colour - how Windows handles 16 bit
Texture mapped triangles - Using a texture
The DrawTriangle routine - finishing with a texture map
Conclusion
Closing Words
Thanks
Onwards...
Following on from part 1 of this article, we are now going to look at gouraud shading and texture mapping. The worst part is actually over, to implement these, and many other features is just a case of stepping a few more deltas along the left hand side of the triangle.
The Gouraud Shaded Triangle
The problem with flat shaded polygons is they look like flat shaded polygons, it would look more pleasing if the polygons had a shading across the surface of the polygon. This is basically what gouraud shading is, it assigns a colour to each vertex and the interpolates the colour across the polygon as well. The colour can be specified in two ways, the first is the palletised version which means we only need specify a single intensity value. The second way is true R,G,B gouraud shading, this is where your specify a particular red, green and blue value for each vertex. I will be looking at the palletised idea first as this only involves interpolating a single value. The value of the intensity is usually between 0 and 255, this is the palette index and for best results is a fade between black and another colour.
The original way I used to do this routine was to take the intensity at the top vertex and work out deltas, based on the height of the section, to the next intensity. Having the intensity at each side of the current line I used to work out the delta needed during the drawing. If we look at this on a diagram we can work out some of the deltas.
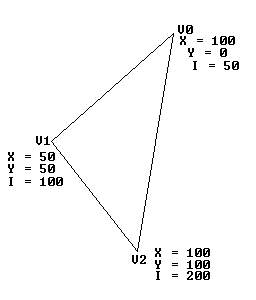
Triangle with intensity values.
There are 2 deltas based on the height of the edge sections for this triangle. The first is for the left hand edge V0 - V1, we will be drawing 50 separate lines (V1.y - V0.y = 50 - 0 = 50), Over these 50 lines we will be altering the Intensity from 50 at the start to 100 at the end, being a change of 50. If we divide the Intensity change by the height distance we get the delta for this edge, (v1.I - v0.I) / (v1.Y - v0.Y) = 50 / 50 = 1, this means for each horizontal line (Y line) we alter the intensity by an increase of 1. The second value we need is for the right hand edge, following the same pattern we get 150 / 100 = 1.5, so for each Y line we move down we need to increase the intensity value for the right hand edge by 1.5. If we look at the first 5 lines we get the following intensity values for the left and right hand edges.
Line 1 : Left I = 50 - Right I = 50 (Increase Left by 1 and Right by 1.5)
Line 2 : Left I = 51 - Right I = 51.5 (Increase Left by 1 and Right by 1.5)
Line 3 : Left I = 52 - Right I = 53 (Increase Left by 1 and Right by 1.5)
Line 4 : Left I = 53 - Right I = 54.5 (Increase Left by 1 and Right by 1.5)
Line 5 : Left I = 54 - Right I = 56 (Increase Left by 1 and Right by 1.5)
Having the intensities for the left and right hand edges we can, for these 5 lines, work out the delta required to take the left intensity to the right intensity over the width of the line. To do this we need to know the width of each line.
Line 1 : Width = 0
Line 2 : Width = 1
Line 3 : Width = 2
Line 4 : Width = 3
Line 5 : Width = 4
HANG ON!!!!!!!!!!! What do you notice about those line based intensity delta values???? They are all the same, apart from the first one, but with a line length of 0 it doesn't matter. This is called the 'Constant Delta Value'. This little fact makes the idea of shading a bit easier (And texture mapping and environment mapping...). All we need to do is to work out the constant delta value of the triangle and then we only need interpolate the intensity value down the left hand edge, removing the need to calculate the right delta. We also loose the need to do a division per pixel to work out the delta value ((Right I - Left I) / Width). The best way of calculating the constant delta is to use the longest line, this is because we cannot be sure that the line we use will not have a length of zero which will not provide the correct information.
Because of how the previous flat shaded polygon routine was coded there is very little change that is required to make the routine draw a shaded polygon. The first thing we need to do, even before we enter the drawing loop, is to calculate the constant delta. To do this we need to work out the intensity value at the intersect point on the long side, on the same horizontal line as the middle vertex. We have already looked at how to do this when we looked at how to work out the X value of the intersect point. Once we have this value we can subtract the middle vertex intensity from the value we just worked out, then be divide by the longest line, this will give us a constant delta value.
Having the constant delta value we just need to calculate the left edge delta. Now the reason for having two separate CalculateDelta() routine becomes apparent. In the CalculateLeftDeltas() routine we need to store the starting Intensity and work out the delta Intensity just as we do for the X deltas.
Once we have this information we can simply add the left intensity delta to the current left intensity value every time we move down a Y line. For every horizontal line we take a copy of the current left intensity and then, for every pixel, we add the constant delta value. Because we are using the palletised version we can simply plot this value to the screen and he-presto, a gouraud shaded triangle. The main inner loop looks like the following.
    // Work out the first line if the screen
    unsigned char *pDestBuffer = pScreen + (((int)pVertex1->fY) * lPitch);

    // The vertical line loop for the polygon - we will break out of the loop
    for(;;)
    {
        int nX1 = ((int)m_LeftEdge.m_fX);
        int nWidth = ((int)m_RightEdge.m_fX)) - nX1;

        // NEW LINE - GET CURRENT INTENSITY
        float fIntensity = m_LeftEdge.m_fIntensity;

        if ( nWidth >= 0 )
        {
            // Make sure that there is something to draw
            unsigned char *pDestStrt = pDestBuffer + nX1;

            // The actual drawing of the scan line
            do
            {
                // NEW LINES = COPY THE PIXEL AND ALTER THE INTENSITY
                *pDestStrt++ = ((unsigned char)fIntensity);
                fIntensity += fConstantDelta;
            }while (--nWidth >= 0);
        }

        pDestBuffer += lPitch;

        // Work out whether we are at the end of this sections
        if ( --m_LeftEdge.m_nSectionHeight <= 0 )
        {
            // See if there are any more sections
            if ( --m_LeftEdge.m_nVertices <= 0 )
            {
                return;
            }

            // Else do the last section
            if ( CalculateLeftDeltas() <= 0 )
            {
                return;
            }
        }
        else
        {
            m_LeftEdge.m_fX += m_LeftEdge.m_fDeltaX;

            // NEW LINE - INCREASE INTENSITY ON Y
            m_LeftEdge.m_fIntensity += m_LeftEdge.m_fDeltaIntensity;
        }

        // Work out whether we are at the end of this sections
        if ( --m_RightEdge.m_nSectionHeight <= 0 )
        {
            // See if there are any more sections
            if ( --m_RightEdge.m_nVertices <= 0 )
            {
                return;
            }

            // Else do the last section
            if ( CalculateRightDeltas() <= 0 )
            {
                return;
            }
        }
        else
        {
            m_RightEdge.m_fX += m_RightEdge.m_fDeltaX;
        }
    }
LIGHT TRIANGLE SOURCE FILES:
LightTriangle.cpp
LightTriangle.h
The RGB Gouraud Shaded Triangle
Now we get into the nitty-gritty of drawing triangles, the r,g,b version. The code I provide for this routine will only work out a 24bit screen. This means the screen has 3 bytes per pixel, the first is the red value, then the green value and finally the blue value. The alterations to the light triangle routines are VERY small, all we need to do is to, rather that just step the intensity value, we need to do the same calculations on the Red, green and blue values separately. You will need to work out the constant delta for the three values separately, but like in the previous example they are the same throughout the triangle.
Be warned that if you intend to write a 16 bit R,G,B Gouraud shader then you will need to mask and shift the colour components correctly. Windows, under DirectX, has two different 16 bit modes, 5:6:5 and 5:5:5. Both of these are valid 16 bit modes, but the first has the 6 bits of green colour while the other only has 5. I always find it easier to check for the mode and have separate routines for each. Just incase here are the 16 bit layouts of each mode.
        16.......7......0 (Bit)
5:6:5 = RRRRRGGG GGGBBBBB
5:5:5 = XRRRRRGG GGGBBBBB
Where R = Red component, G = Green component, B = Blue component and X is not used (leave 0).
If you want the source code to this routine then it's here:
RGB TRIANGLE SOURCE FILES:
RGBTriangle.cpp
RGBTriangle.h
The Texture Mapped Triangle
Texture mapping is essentially the same as the previous two methods. You might start to notice patterns in the routines, this is because the main work was done for the flat shaded polygons, now all we need to do is to interpolate different values across the triangle. In the case of texture mapping we interpolate a U,V coordinate pair. The U,V coordinates are the point on the texture map. I tend to use square textures that are a power of 2, that is textures with a width and height of 8, 16, 32, 64, 128 or 256. The reason for this is that most 3d accelerator cards prefer power of 2 size textures plus you can speed up the drawing of the texture map if you can rely on this.
So for each vertex we specify a U,V coordinate - U being the X position in the texture and the V being the Y position in the texture. Like before work out the start value on the left edge, work out the left edge delta and work out the constant deltas. Once you have this all you need to do is, for every pixel, get the texture pixel at coordinates U,V, that is:
    // pTexture = start of texture (256 x 256)
    // The inner drawing loop would be

    // Work out the first line if the screen
    unsigned char *pDestBuffer = pScreen + (((int)pVertex1->fY) * lPitch);

    // The vertical line loop for the polygon - we will break out of the loop
    for(;;)
    {
        int nX1 = ((int)m_LeftEdge.m_fX);
        int nWidth = ((int)m_RightEdge.m_fX)) - nX1;

        // NEW LINE - GET U,V
        float fU = m_LeftEdge.m_fU;
        float fV = m_LeftEdge.m_fV;

        if ( nWidth >= 0 )
        {
            // Make sure that there is something to draw
            unsigned char *pDestStrt = pDestBuffer + nX1;

            // The actual drawing of the scan line
            do
            {
                // NEW LINES = COPY THE PIXEL AND ALTER THE
                // TEXTURE COORDINATES
                *pDestStrt++ = *(pTexture + ((int)fU) + (((int)fV) << 8));
                fU += fConstantDeltaU;
                fV += fConstantDeltaV;
            } while (--nWidth >= 0);
        }

        pDestBuffer += lPitch;

        // Work out whether we are at the end of this sections
        if ( --m_LeftEdge.m_nSectionHeight <= 0 )
        {
            // See if there are any more sections
            if ( --m_LeftEdge.m_nVertices <= 0 )
            {
                return;
            }

            // Else do the last section
            if ( CalculateLeftDeltas() <= 0 )
            {
                return;
            }
        }
        else
        {
            m_LeftEdge.m_fX += m_LeftEdge.m_fDeltaX;

            // NEW LINE - INCREASE U,V
            m_LeftEdge.m_fU += m_LeftEdge.m_fDeltaU;
            m_LeftEdge.m_fV += m_LeftEdge.m_fDeltaV;
        }

        // Work out whether we are at the end of this sections
        if ( --m_RightEdge.m_nSectionHeight <= 0 )
        {
            // See if there are any more sections
            if ( --m_RightEdge.m_nVertices <= 0 )
            {
                return;
            }

            // Else do the last section
            if ( CalculateRightDeltas() <= 0 )
            {
                return;
            }
        }
        else
        {
            m_RightEdge.m_fX += m_RightEdge.m_fDeltaX;
        }
    }
That's all there is too it. The source code for a texture mapper is here.
TEXTURE TRIANGLE SOURCE FILES:
TextureTriangle.cpp
TextureTriangle.h
Conclusion
I hope that this has given you an insight into the world of triangles and how to draw them by hand. It is too easy these days to use the graphics hardware, but sometimes it's nice to go back to basics and look at how it all started.
If you want to read more about polygons, texturing etc. then here are a few links for you:
FatMap.txt - This is a very comprehensive guide to texture mapping.
FatMap2.txt - An update to the above article.
ArthClip.txt - An old article I wrote on polygon clipping.
Closing Words
As I said at the start, I would appreciate if people could drop me an email to let me know what they think. If there are any mistakes, which there are bound to be, again, drop me a line and Ill sort it out. Here is a quick list of things I could cover in another document if people are interested:
Environment Mapping
Assembler optimizations
Pentium 3 / 3D Now optimizations
Bump mapping
Triangle clipping to the screen (the current polygon routines above require the polygon to be clipped to the screen)
Anything else, let me know.
Thanks
Thanks must go out to
Dranath of TZT, Vampire of TZT - guys, as usual how could this sort of thing be done without your help.
Ballistique - The ukscene.org site is great, it's good to see others in the scene doing constructive stuff. How could the ukscene survive without your presence
Ravian - What would the world come to without ya rav. Always there with the answers. People like you come once in a lifetime
Statix - Always good to see your latest stuff, keep up the great work.
Anyone else on #ukscene and in the scene in general.
Darkblade/TZT