Polygon Drawing - Part 1
By Darkblade/TZT
Version 2.00 - Updated 10th March 2003
Disclaimer
Although a lot of time has gone into writing this document, Darkblade (Adrian Brown), Hugi and TZT hold no responsibility for the accuracy or effects of using this document. Any person using the information contained within this file do so at their own risk.
Contents
 Introduction
Creating the first application
Flat shaded polygons - Line table version
The DrawPolygon routine - drawing the data to screen
The Line routine - calculating the lines
The ResetTable routine - initialising the data
The FlatPolygon routine - putting it all together
The Line routine - adding vertical clipping
The DrawPolygon routine - adding horizontal clipping
Flat shaded triangles - Working the constant deltas
The Triangle routine - setting up the line deltas
The CalculateRightDeltas routine - calculating the right hand delta
The CalculateLeftDeltas routine - calculating the left hand delta
The DrawTriangle routine - drawing the triangle with deltas
Introduction
I remember when I first watched a demo called 'Unique' on my friend's Amiga 500. It was the first thing I had ever seen on a computer that had real-time 3D graphics, I had seen the freescape 3d engine used on the game Driller, but this was fast and it amazed me. It wasn't for another 4 years until I learnt how to do 3d myself. The first 3d program I wrote was on the Amiga, which had the advantage of having a blitter that could draw the lines of the polygons and fill in the gaps. When I started on the PC it took me a little longer to work out how to do polygons again.
This article is designed to take you from the basics of flat shaded polygon drawing, all the way through to textured polygons. I hope you find the information in this document useful. If you use this file or would like to see any other information written up then email me at darkblade@ukscene.org.
Through this article you will often see me using a mild form of Hungarian notation. Since these files are in cpp classes I use m_ for any variable that is a member of the class, p for pointers to memory/objects etc. All class names start with a capital C. Hopefully this will not make reading the code difficult.
If you would like to save yourself a lot of typing, all the source code presented in this article can be found here.
If you are grabbing the individual source files linked through the document then you also need this file.
The Basic Flat Shaded Polygon
A lot of people will tell you that the best way to draw a polygon is via an edge list table. Now although I don't agree, I'll run through this as it is one of the easier methods of polygon drawing. It basically involves storing an array as big as the height of the screen. For each horizontal line of the screen the array holds two values, the start and stop x coordinate of the polygon for that line. This means that the main drawing of the polygon can be done with a very simple loop.
void CPolygon::DrawPolygon(void)
{
    // Get a pointer to the beginning of the screen
    unsigned char *pScreen = ScreenBuffer;

    // Loop through all the horizontal lines on the screen
    for ( int nY = 0; nY < SCREEN_HEIGHT; nY++ )
    {
        // First check if the polygon touches this line of the screen
        // we use -32767 as a null line
        if ( PolygonEdgeTable[nY].nStartX != -32767
               && PolygonEdgeTable[nY].nEndX != -32767 )
        {
            // Do a for loop from the start to the end pixels inclusive
            for ( int nX = PolygonEdgeTable[nY].nStartX;
                    nX <= PolygonEdgeTable[nY].nEndX; nX++ )
            {
                pScreen[nX] = nColour;
            }
        }

        // Move the screen pointer down to the next line
        pScreen += SCREEN_WIDTH;
    }
}
This may not be the most effective drawing routine, but it does show the simplicity of this edge table polygon drawing technique. The thing is, I haven't gone over the other parts of the code required, such as the edge table setup routines. The other main drawback with this routine is the fact that you need to set the start x values to -32767 before starting, this is so we can tell which lines we need to draw.
Let's look at the routine to setup the polygon edge table. This is done by calling a routine passing a list of points, generally x,y screen coordinates. The structure we shall use for the points (or they are generally called) looks like this.
typedef struct VERTEX_TAG
{
    // The x,y coordinate pair
    int nX, nY;
} VERTEX;
I tend to find that floats are better than integers, but we are working on an edge table routine which seems to work better with integers. Some people will say that floats are slower, but when we come to the second way of drawing polygons, I find floats are not as slow as people think, especially when it comes to textures. If you want to alter the code and use fixed point integer then go right ahead, it makes no real difference to the underlying idea behind the code.
From this list of points we are going to run through each line of the polygon in turn, working out where this line is on each horizontal screen line. To do this we need to make sure the line is going in a downwards direction, if it isn't then we need to switch the points over. This is not strictly true, you can work with lines that go the other way, but believe me, it's easier and faster to switch the points over. So we have now got two vertices - V1 and V2. We know that the line starts on the first vertex Y coordinate and runs down the screen until the second vertex Y coordinate, but what we need to do is to find out what the X coordinate is for each of these horizontal lines.
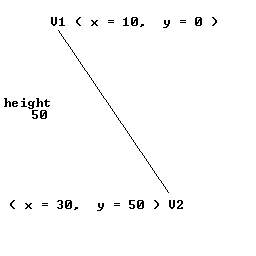
From this diagram we can see that the line goes from Y = 0 to Y = 50; this means that the line is 50 pixels high. Now the line starts on X = 10 and ends on X = 30. This means we need to move 20 pixels in the X direction ( 30 - 10 = 20 ), over the 50 pixels in the Y direction. If we divide 20 by 50 we get the number of pixels we need to move in X for every pixel in Y we move, in this case 0.4 pixels. Using this information if we start at X = 10 and loop for the 50 pixels we need to move in the Y direction, increasing the X position by 0.4 each time we would end up at the with the correct X value of 30 (10 + (50 * 0.4) = 30).
Using the above technique we can now write a routine that takes in two vertices and fills in the edge table as required.
void CPolygon::Line(VERTEX *pV1, VERTEX *pV2)
{
    // First - work out which is the top and bottom vertices
    VERTEX *pTop = pV1, *pBottom = pV2;

    // Get the height and use that to work out which way round the points are
    int nHeight = (pV2->nY - pV1->nY);

    if ( nHeight == 0 )
    {
        // We don't want to display a single line
        return;
    }
    else if ( nHeight < 0 )
    {
        // Swap things over - and negate the height
        nHeight = -nHeight;
        pTop = pV2;
        pBottom = pV1;
    }

    // We can now work out the delta x and the integer y start
    float fdX = (float)(pBottom->nX - pTop->nX)
                  / (float)(pBottom->nY - pTop->nY);
    int nY = pTop->nY

    // Now we can start adding the coordinates in the line buffer.
    // We skip the first point so we don't add the vertices twice as
    // the lines share vertices.
    float fX = (float)(pTop->nX) + fdX;
    nY++;
    nHeight--;

    // Loop through the entire height
    while ( nHeight >= 0 )
    {
        // Work out the current x pixel
        int nX = (int)(fX);

        // If there is already something in the start x then we need to
        // sort out which is the start and end
        if ( PolygonEdgeTable[nY].nStartX != -32767 )
        {
            if ( PolygonEdgeTable[nY].nStartX < nX )
            {
                PolygonEdgeTable[nY].nEndX = nX;
            }
            else
            {
                PolygonEdgeTable[nY].nEndX = PolygonEdgeTable[nY].nStartX;
                PolygonEdgeTable[nY].nStartX = nX;
            }
        }
        else
        {
            // Just store this in the start x coordinate
            PolygonEdgeTable[nY].nStartX = nX;
        }

        // Increase the x coordinate by the delta
        fX += fdX;
        nY++;
        nHeight--;
    }
}
There are only two other routines we need to write, they are the routines to reset the start x coordinate of the table to -32767 and the routine to actually call the above line routine with all the lines in the polygon. Let's look at the routine to reset the edge table first.
void CPolygon::ResetTable(void)
{
    // Loop for the entire screen height
    for ( int nY = 0; nY < SCREEN_HEIGHT; nY++ )
    {
        PolygonEdgeTable[nY].nStartX = -32767;
        PolygonEdgeTable[nY].nEndX = -32767;
    }
}
I know the routine wasn't the most complex in the world but I thought I better add it for completeness. The last routine is the routine to call the line and draw polygon routines. So let's look at the polygon routine:
void CPolygon::FlatPolygon(VERTEX*pVertices, int nNumVertices)
{
    // First thing we need to do is to reset the table
    ResetTable();

    // Now we can add all the lines in the polygon
    for ( int nV = 0; nV < nNumVertices; nV++ )
    {
        // Check for looping back to the first vertex
        // - remember -1 because we are 0 based
        if ( nV == (nNumVertices - 1) )
        {
            Line(&pVertices[nV], &pVertices[0]);
        }
        else
        {
            Line(&pVertices[nV], &pVertices[nV + 1]);
        }
    }

    // Now we have added all the coordinates we can draw the polygon
    DrawPolygon();
}
One thing you may or may not have noticed is that this routine does not do any clipping. Vertical clipping is easy enough and can be added in the line routine, all that is needed is a check for nY being above or below the screen. Let's have a look at the alterations required.
void CPolygon::Line(VERTEX *pV1, VERTEX *pV2)
{
    // First - work out which is the top and bottom vertices
    VERTEX *pTop = pV1, *pBottom = pV2;

    // Get the height and use that to work out which way round
    // the points are
    int nHeight = (pV2->nY - pV1->nY);

    if ( nHeight == 0 )
    {
        // We don't want to display a single line
        return;
    }
    else if ( nHeight < 0 )
    {
        // Swap things over - and negate the height
        nHeight = -nHeight;
        pTop = pV2;
        pBottom = pV1;
    }

    // We can now work out the delta x and the integer y start
    float fdX = (float)(pBottom->nX - pTop->nX)
                  / (float)(pBottom->nY - pTop->nY);
    int nY = pTop->nY

    // Now we can start adding the coordinates in the line buffer.
    // We skip the first point so we don't add the vertices twice as
    // the lines share vertices.
    float fX = (float)(pTop->nX) + fdX;
    nY++;
    nHeight--;

    // Loop through the entire height
    while ( nHeight >= 0 )
    {
        // Work out the current x pixel
        int nX = (int)(fX);

        // CLIPPING TEST - nY < 0 then keep moving until we get onto the
        // screen. nY >= SCREEN_HEIGHT then we can exit as we have fallen
        // off the bottom of the screen
        if ( nY < 0 )
        {
            // Increase the x coordinate by the delta and the y by 1
            fX += fdX;
            nY++;
            nHeight--;
        }
        else if ( nY >= SCREEN_HEIGHT )
        {
            // We can exit now
            break;
        }
        else
        {
            // If there is already something in the start x then we need to
            // sort out which is the start and end
            if ( PolygonEdgeTable[nY].nStartX != -32767 )
            {
                if ( PolygonEdgeTable[nY].nStartX < nX )
                {
                    PolygonEdgeTable[nY].nEndX = nX;
                }
                else
                {
                    PolygonEdgeTable[nY].nEndX
                      = PolygonEdgeTable[nY].nStartX;
                    PolygonEdgeTable[nY].nStartX = nX;
                }
            }
        }
        else
        {
            // Just store this in the start x coordinate
            PolygonEdgeTable[nY].nStartX = nX;
        }

        // Increase the x coordinate by the delta
        fX += fdX;
        nY++;
        nHeight--;
    }
}
This takes care of the vertical clipping, but what about the horizontal, well that is easiest done as we are drawing each line. The easy way is, as usual, the slowest way, per pixel clipping. This simply involves putting a check inside the pixel drawing routine. This means that the new DrawPolygon routine will look something like this.
void CPolygon::DrawPolygon(void)
{
    // Get a pointer to the beginning of the screen
    unsigned char *pScreen = ScreenBuffer;

    // Loop through all the horizontal lines on the screen
    for ( int nY = 0; nY < SCREEN_HEIGHT; nY++ )
    {
        // First check if the polygon touches this line of the screen
        // we use -32767 as a null line
        if ( PolygonEdgeTable[nY].nStartX != -32767
               && PolygonEdgeTable[nY].nEndX != -32767 )
        {
            // Do a for loop from the start to the end pixels inclusive
            for ( int nX = PolygonEdgeTable[nY].nStartX;
                    nX <= PolygonEdgeTable[nY].nEndX; nX++ )
            {
                if ( nX >= 0 && nX < SCREEN_WIDTH )
                {
                    pScreen[nX] = nColour;
                }
            }
        }

        // Move the screen pointer down to the next line
        pScreen += SCREEN_WIDTH;
    }
}
Well that is really all there is to the flat shaded polygon routine. As I said at the start though, this has to be one of the slowest polygon drawing routines I know. We can now look at how to speed up this idea and how to add extra features to the routine such as shading, gouraud shading, texturing and maybe more.
FLAT POLYGON SOURCE FILES:
FlatPolygon.cpp
FlatPolygon.h
The Basic Flat Shaded Triangle
When we come to do texturing and other effects, trying to handle polygons becomes hard. It is much easier if we only handle the simplest type of polygon, the triangle. This will allow us to make far more optimizations than if we try and handle n-sided polygons. Another optimization comes from only handling non-backfaced triangles. This is when we do not attempt to draw triangles that we are looking at the back of. This is easiest done if we can guarantee that the points are specified in a specific order. I tend to use clockwise order. This means if we are looking at a triangle, vertex 0 is the top, next comes the bottom vertex and finally the vertex on the left handle side of. See the diagram below...
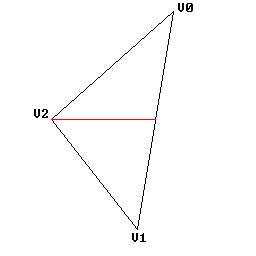
A front facing triangle.
The advantage with this is that we can tell when the polygon becomes backfaced by looking at the order of the points. If rather than going 0-1-2 they go 0-2-1, then we know we are looking at the back of the polygon, and hence do not wish to draw it.
As I mentioned above, there are many advantages to drawing triangles. One of these advantages is, once we know we are looking at the front of the triangle, we can then find out other information, such as the longest horizontal line of the triangle. A triangle always has a long side, vertices 0-1 in the above example, with an extra vertex being on either the left or right hand side (left in the above example). The longest horizontal line is from the extra vertex to the point on the long side which is on the same vertical level, marked by the red line in the above diagram.
If we work out the distance the extra vertex is from the long side, we can use this to work out any constant deltas, and also whether the extra vertex is on the left or the right hand side of the long side (indicated by a positive or negative value). I'll come onto the constant deltas when we look at gouraud shading, for now we need to work out the point on the long side that is on the same vertical level as vertex 2. This can be achieved via a little maths, unfortunately it relies on the vertices being in a set order, so the best thing to do first is to organise the vertices based on their vertical position.
To order the vertices, simply compare all of their Y positions and swap them over so you have vertex 0 at the top, vertex 1 at the side and vertex 2 at the bottom. With this done we need to find out the relative position of the extra vertex compared to the long side of the triangle.
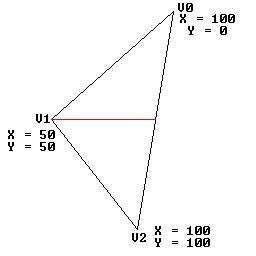
Vertices positioned based on height.
(I know the coordinates wouldn't be the values they are)
To work out the relative position we need to work out the height of the section v0-v1 being 50 (v1.y - v0.y). This is then divided by the height of the section v0-v2 being 100 (v2.y - v0.y), 50 / 100 = 1 / 2 = 0.5. This means that V1 is exactly half way down the long side at Y = 50.
You may say that you already knew this because it's the Y value for vertex 1, and you would be right, but now we have the relative position 0.5. Next we need to work out the X position on the long side where the Y is 50. To do this take the difference from the bottom and top vertex X positions (v2.x - v0.x), 0 in our case, and multiply this by the relative position value we worked out, 0.5. If we then add on the X position of the top vertex we get 100, this is because our line is actually vertical, but try this with a few different values and you'll soon see that it works out the correct X position.
We now know the exact position on the long side where the extra vertex is on the same horizontal line (the red line), so if we simply subtract the X position of the extra vertex we can find out whether the extra vertex is on the left or the right of the long side, in our case we get 100 - 50 = 50. A positive value means the vertex is on the left, a negative means it's on the right. If you get a value of 0 then the extra vertex is actual on the line of the long side, I then tend to exit out of the polygon drawing routine.
There are other ways of finding out whether the extra vertex is on the left or the right hand side of the polygon but this, as you will see later, provides us with information that makes other forms of polygon drawing much easier. If you didn't fully understand is, don't worry you can always re-read it later.
A triangle can be split up into two sections, the top half, which is from the top to the middle vertex and to the corresponding point on the long edge, and the bottom half being the rest of the triangle. The reason for splitting the polygon up into two section is due to the fact that the deltas for the edges, that is the amount we need to add onto the X position for every Y line we draw, change only at this point, and only on one side. This makes life very easy, we simply work out the delta from the top vertex to the bottom vertex, this will be the same for both sections of the triangle. For the first section we need the delta from the top to the middle vertex and for the second section we need the delta from the middle vertex to the bottom vertex.
I tend to use a table for which vertices I need to visit on the left and right side of the triangle, to do this I use the information about the extra point to work out which table needs the point added to it. I can then have a routine that calculates all the information about the next section for the left side of the triangle, and a similar routine that works out the information for the right side of the triangle. These routines can then be used for both the top and the bottom section of the triangle. Lets start looking at the code that will draw the triangle, starting with the code to organize the vertices into height order and then work out the length of the longest horizontal line.
void CFlatTriangle::Triangle(VERTEX *pVertex, unsigned char *pScreen,
                               int lPitch, unsigned char nColour)
{
    // Take a copy of the each vertex pointer
    VERTEX *pVertex1 = pVertex;
    VERTEX *pVertex2 = pVertex + 1;
    VERTEX *pVertex3 = pVertex + 2;

    // First thing we need to do is to sort the vertex so that they are
    // in order. i.e. Vertex1 is at the top followed by vertex2 and then
    // vertex3. Make sure V1 is above V2
    if ( pVertex1->fY > pVertex2->fY )
    {
        VERTEX *pTemp = pVertex1;
        pVertex1 = pVertex2;
        pVertex2 = pTemp;
    }

    // Now make sure V1 is above V3
    if ( pVertex1->fY > pVertex3->fY )
    {
        VERTEX *pTemp = pVertex1;
        pVertex1 = pVertex3;
        pVertex3 = pTemp;
    }

    // V1 is at the top - so now sort out V2 and V3
    if ( pVertex2->fY > pVertex3->fY )
    {
        VERTEX *pTemp = pVertex2;
        pVertex2 = pVertex3;
        pVertex3 = pTemp;
    }

    // Work out the height of the polygon
    float fHeight = pVertex3->fY - pVertex1->fY;

    // Check that the polygon is not 0 in height - this would cause
    // a divide by 0 below
    if ( fHeight == 0.0f )
    {
        return;
    }

    // We now need to work out the longest line of the triangle - this is
    // the point where the middle vertex cuts across to the longest edge
    float fTemp = (pVertex2->fY - pVertex1->fY) / fHeight;
    float fLongest = (fTemp * (pVertex3->fX - pVertex1->fX))
                       - (pVertex2->fX - pVertex1->fX);

    // As you can see I have moved over to using floats as I find them
    // faster for the main chunk of the maths work. Now we have the
    // information about which side of the polygon the extra line is on we
    // can start to setup the edge tables.
    if ( fLongest < 0.0f )
    {
        // If longest is neg. we have the middle vertex on the right side.
        // Store the pointers for the right and left edge of the triangle.
        m_RightEdge.m_pVertices[0] = pVertex3;
        m_RightEdge.m_pVertices[1] = pVertex2;
        m_RightEdge.m_pVertices[2] = pVertex1;
        m_RightEdge.m_nVertices = 3 - 1;

        m_LeftEdge.m_pVertices[0] = pVertex3;
        m_LeftEdge.m_pVertices[1] = pVertex1;
        m_LeftEdge.m_nVertices = 2 - 1;

        // Calculate initial left and right parameters
        if ( CalculateLeftDeltas() <= 0 )
        {
            return;
        }

        if ( CalculateRightDeltas() <= 0 )
        {
            // Check whether there is another section to this triangle
            m_RightEdge.m_nVertices--;

            if ( CalculateRightDeltas() <= 0 )
            {
                return;
            }
        }
    }
    else
    {
        // If longest is pos. we have the middle vertex on the left side.
        // Store the pointers for the left and right edge of the triangle.
        m_LeftEdge.m_pVertices[0] = pVertex3;
        m_LeftEdge.m_pVertices[1] = pVertex2;
        m_LeftEdge.m_pVertices[2] = pVertex1;
        m_LeftEdge.m_nVertices = 3 - 1;

        m_RightEdge.m_pVertices[0] = pVertex3;
        m_RightEdge.m_pVertices[1] = pVertex1;
        m_RightEdge.m_nVertices = 2 - 1;

        // Calculate initial right and left parameters
        if ( CalculateRightDeltas() <= 0 )
        {
            return;
        }

        if ( CalculateLeftDeltas() <= 0 )
        {
            // The first left section had zero height.
            // Use the next section.
            m_LeftEdge.m_nVertices--;

            if ( CalculateLeftDeltas() <= 0 )
            {
                return;
            }
        }
    }
}
This section of code sets up the vertices in order that I need to run through them, you may notice two things. One, I put the vertices in the tables backwards, and two, I call two routines called CalculateLeftDeltas() and CalculateRightDeltas(). The vertices are in the table backwards because I used the m_nVertices count to reference them, it's easier than storing two values, one for the current entry we are looking at and one for the number of entries on this table.
The two routines basically work out the height of the section and providing it's not 0 they work out the delta for this edge section and the starting X value. They then return the height of the section.
If the extra vertex is on the left on the long side then if the CalculateRightDeltas() returns 0 we can ignore the entire polygon because it means the long side is actually zero in height, this case is caught earlier but it doesn�t hurt to check again.
If on the other hand the CalculateLeftDeltas() returns zero we could still have the second section to draw so we have to try again. The first section would be 0 if the polygon had a flat top.
Just for completeness here is the code for the two routines (inline for speed reasons), I know that they are basically the same but they will be different for shaded polygons.
inline int CFlatTriangle::CalculateRightDeltas(void)
{
    VERTEX *pVertex1 = m_RightEdge.m_pVertices[m_RightEdge.m_nVertices];
    VERTEX *pVertex2 = m_RightEdge.m_pVertices[m_RightEdge.m_nVertices - 1];

    // Calculate the height of this section
    m_RightEdge.m_nSectionHeight = ((int)pVertex2->fY) - ((int)pVertex1->fY);

    // Check whether this sections is going to be a 0 height section
    if ( m_RightEdge.m_nSectionHeight == 0 )
    {
        return 0;
    }

    // Calculate the deltas along this section
    m_RightEdge.m_fDeltaX = (pVertex2->fX - pVertex1->fX)
                             / ((float)m_RightEdge.m_nSectionHeight);
    m_RightEdge.m_fX = pVertex1->fX;

    // Return the height of this section
    return m_RightEdge.m_nSectionHeight;
}


inline int CFlatTriangle::CalculateLeftDeltas(void)
{
    VERTEX *pVertex1 = m_LeftEdge.m_pVertices[m_LeftEdge.m_nVertices];
    VERTEX *pVertex2 = m_LeftEdge.m_pVertices[m_LeftEdge.m_nVertices - 1];

    // Calculate the height of this section
    m_LeftEdge.m_nSectionHeight = ((int)pVertex2->fY) - ((int)pVertex1->fY);

    // Check whether this sections is going to be a 0 height section
    if ( m_LeftEdge.m_nSectionHeight == 0 )
    {
        return 0;
    }

    // Calculate the deltas along this section
    m_LeftEdge.m_fDeltaX = (pVertex2->fX - pVertex1->fX)
                             / ((float)m_LeftEdge.m_nSectionHeight);
    m_LeftEdge.m_fX = pVertex1->fX;

    // Return the height of this section
    return m_LeftEdge.m_nSectionHeight;
}
The last thing we need to look at is how to actual draw the polygons with this information, well that's the easy part. The first thing is to calculate the first screen line we are going to draw, this is the top vertex Y position. We then draw the line from the current left X position to the current right X position. At the end of the line we need to work out the new position, only if we have not done all of the section.
    // Work out the first line if the screen
    unsigned char *pDestBuffer = pScreen + (((int)pVertex1->fY) * lPitch);

    // The vertical line loop for the polygon - we will break out of the loop
    for(;;)
    {
        int nX1 = ((int)m_LeftEdge.m_fX);
        int nWidth = ((int)m_RightEdge.m_fX)) - nX1;

        if ( nWidth >= 0 )
        {
            // Make sure that there is something to draw
            unsigned char *pDestStrt = pDestBuffer + nX1;

            // The actual drawing of the scan line
            do
            {
                *pDestStrt++ = nColour;
            } while (--nWidth >= 0);
        }

        pDestBuffer += lPitch;

        // Work out whether we are at the end of this sections
        if ( --m_LeftEdge.m_nSectionHeight <= 0 )
        {
            // See if there are any more sections
            if ( --m_LeftEdge.m_nVertices <= 0 )
            {
                return;
            }

            // Else do the last section
            if ( CalculateLeftDeltas() <= 0 )
            {
                return;
            }
        }
        else
        {
            m_LeftEdge.m_fX += m_LeftEdge.m_fDeltaX;
        }

        // Work out whether we are at the end of this sections
        if ( --m_RightEdge.m_nSectionHeight <= 0 )
        {
            // See if there are any more sections
            if ( --m_RightEdge.m_nVertices <= 0 )
            {
                return;
            }

            // Else do the last section
            if ( CalculateRightDeltas() <= 0 )
            {
                return;
            }
        }
        else
        {
            m_RightEdge.m_fX += m_RightEdge.m_fDeltaX;
        }
    }
That is the entire of the flat shaded polygon routine. This has a great advantage over the previous version as it only requires a few changes to take it from a flat triangle drawing routine to a gouraud shaded, texture mapped or environment mapped drawing routine.
FLAT TRIANGLE SOURCE FILES:
FlatTriangle.cpp
FlatTriangle.h
In the next part
In the next part we shall continue using the theory of the constant delta to build Gouraud shading and textured triangles....
Darkblade/TZT